Sunday, November 27, 2016

The fireplace is finished! And to my surprise, I got it finished in time for Thanksgiving!  I am very pleased with how if came out.


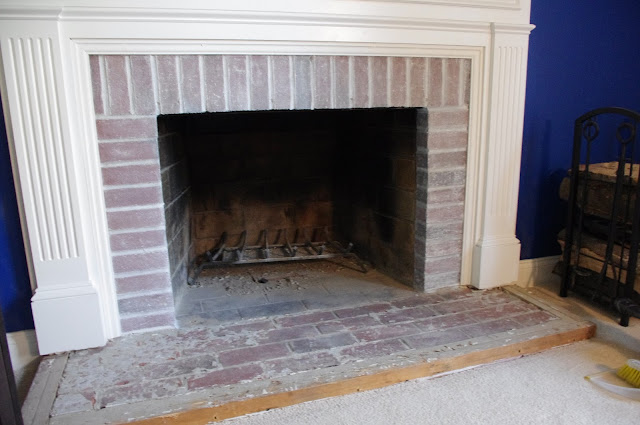
The hearth had this very cheap looking tile on it, which was actually over the original brick.  When the previous owner updated the mantle, they added some width to it.  Instead of adding brick or another stone to the hearth, they framed it with 2x2's and tiled over it.  A cheap fix and that's how it looked.


They used a lot of mastic and it was very difficult to remove.  After trying to hack it off by hand with  a chisel and hammer, Mike took to it with an air chisel and off it came!


I went back and forth and sideways about the brick surround....leave it alone?....tile over it?....paint it?....whitewash it? There were a few conversations about it and I ultimately decided that it needed something and that I would start with whitewashing it.  If I hated the whitewashed brick, I could always paint or tile over it.  Well, I LOVED it!


Now to tiling the hearth....it went very quickly!  And what a difference!


I just love how it looks with the blue walls and pops of orange for Fall!  I can't wait to see how it looks for Christmas!


My next small project is the little brown table.  I started painting it gray and love how its coming out.  It still needs to be waxed and distressed. I will share it when I get around to finishing it.


In the meantime, it gets moved out, along with the brown arm chair, to make room for the Christmas tree.

Happy decorating for the holidays!!!! 


Monday, November 14, 2016

Its been a VERY long time since I posted here.  Life became very busy and I just didn't have the time, but here I am again with another bathroom reveal. Last I wrote, we had just finished the face lift on our upstairs hall bathroom. After we completed that project, we finished a few little things, here and there, and then started on our master bath.

As you can see, it all needed to go. Oh goodness, that yellow paint! For the most part, the entire bathroom was original.  The vanity was newer, but awful and there was laminate flooring covering the original mosaic tile floor.


Demo began and we started to see how much room there was with the wall for the shower removed. It was as if we doubled the bathroom square footage.  Now it was time to plan and design the space. We knew we wanted two pedestal sinks because we only had 50" to the right of the shower and having our own sinks was very important....basically because I don't like to share. So, we shopped around for sinks....I ordered a set from Home Depot and they kept arriving broken.  After 7 sinks, I gave up and bought Kohler pedestals off the shelf from Lowes for under $250 for both.  The kids had fun shopping... they are used to trips to home improvement stores by now!


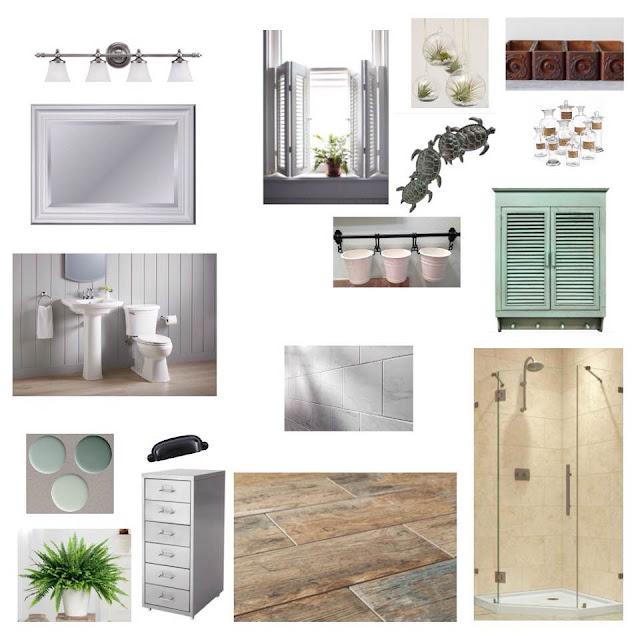
Here is the design concept board for the space.  We wanted it very clean and simple with a bit of a spa feel.
After the demo, plumbing, electrical and sheetrock was complete, it was time for tile.


We started demo in March, the tile was complete in August. Renovating over the summer is very difficult.  I thought it was never going to be finished.  The remainder of the renovation only took a month.


The layout works so much better now, two people can actually get ready at the same time!


Just enough storage for two people, as well. By using this drawer unit from Ikea, we kept the openness from the pedestals.


It was very hard to find bath mats for this layout. I bought two large ones to use one in front of the sinks and then cut one up to use for the shower and the toilet. To keep the mat from fraying, I put a strip of hot glue where it was cut.


Its just so pretty now....and spacious!

My next post will be about our fireplace surround and hearth in our formal living room. We just removed the ugly cheap tile from the hearth and are still deciding what to do with the surround (tile it or paint the existing brick?).  I hope to have it completed and posted by Thanksgiving!